Silhouette SD Giveaway at the DIY Show Off!

SILHOUETTE SD GIVEAWAY


IS NOW CLOSED!

I‘ve been so excited about this day for you! The time has finally arrived! Hurray!!!  


Last week I showed you my very first project using my new Silhouette SD!  This week I’m more acquainted with it. I think I could use it every day – getting crafty with vinyl, heat transfers, printable tattoos, sketches, fabric, printable magnets, card stock, glass etching and more!  There are so MANY fun things to DIY!  I’ve been having so much fun getting familiar with it, sticking to easy fun projects until I learn all of the tricks.  It’s addicting!  Here are some of the easy things I’ve created so far:


Chalkboard Wall {TODAY} label (white vinyl) – our spot for writing appointments, to-do, love notes, reminders and grocery lists. The Silhouette SD machine cuts any font on your computer. No cartridges needed!


Numbered Planters (black vinyl).  I used different fonts I already had and alternated the sizes. 


Frosted Monogrammed Apothecary Jar (frosted vinyl).  Monogram B design purchased for .99 at the Silhouette online store. The frosted vinyl looks beautiful in person.  


(Cat Proof) Antique Doily (Silhouette online store .99) on glass end table (white vinyl) Apply to the underside of the glass.

Monogrammed Mirror (white vinyl) 

Personalized Pet Treat Jar


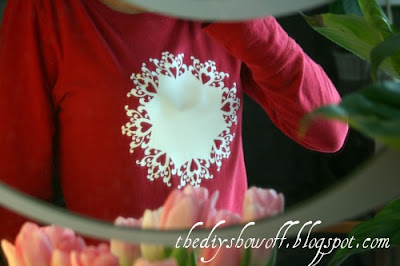
Valentine Doily T-shirt


Now Silhouette is giving away a Silhouette SD to one lucky DIY Show Off reader! 

The prize will be a Silhouette SD, 1 roll of black vinyl, 1 roll of frosted vinyl, 1 roll of transfer paper, and a Home Décor CD of images (retail $375+).


But there’s more! Silhouette is offering DIY Show Off readers a special discount on that same Silhouette and premium vinyl bundle with a unique code SHOWOFF usable at silhouetteamerica.com.  That promo code will get you the Silhouette bundle for $225 ($375+ retail) and/or 25% off premium vinyl if you’re looking to show off.  SHOWOFF code is active from the 23rd through March 1st (if you don’t win – you still get a great deal!).


You’ll find TONS of ideas, tips and tutorials at the Silhouette Blog.

Silhouette


Giveaway Rules:
It only takes 1 chance to be entered to win but enter all 5 ways to increase your chances!
Leave 1 comment for each of the following:

1) Leave a comment sharing the first thing you’d create if you won a Silhouette machine. 
2) I need your help spreading the word! Share a link to this giveaway on Facebook or Twitter (convenient buttons at bottom of this post) – 1 entry. 
2) Become a follower or email subscriber to The DIY Show Off – 1 entry.
3) Comment that you follow the Silhouette Blog (tell ’em I sent ya!) – 1 entry.
5) Blog about this giveaway with a link back to this post – 1 entry.

Remember to leave your email address in your comment if you can’t be reached via your blog!  Giveaway starts 2/23/11 and ends 2/27/11 at midnight EST.  Winner will be drawn using random.org and announced shortly after. Good luck!


Maximize your chances of winning EVEN MORE by visiting the Silhouette Giveaways going on right now with these blog friends too (please tell them ‘hello’ from me)!


*Disclaimer:  I received a Silhouette SD and accessories to review and share projects/tutorials and one lucky DIY Show Off reader will receive the above listed prize but my opinion is honest and is my own.  

The DIY Project Parade

Do you have something DIY related to share this week?  We’re still working on the kitchen  AND cleaning out the basement so we can get electric to where the kitchen island will be above and choosing the flooring and backsplash.  


I managed to squeak in getting familiar with my Silhouette before taking on a “more involved vinyl cutting project” which has me pretty excited to dive right in but best to know what I’m doing and the tips/tricks with Silhouette before taking on a bigger project. If you don’t have a Silhouette – just look at the pictures to see another fun example of what it can do (giveaway coming this week). Skip the red tutorial text.  If you do have a Silhouette and you’re looking for tips, hopefully this tutorial will help a little.


I made this project to get to know my Silhouette a little better.  A starter project.


This is Lalka.  


She needed somewhere to keep these…


Using the Silhouette SD, I personalized a cookie jar just for her.  Here is how we cut vinyl letters for labeling a glass cooking jar.  Trial and error. I wanted the letters smaller, but for cutting vinyl for the first time, best to go with something manageable. I still love the end result. 


I typed out my label using the Silhouette SD software.  Silhouette will cut any font on your computer – no cartridges needed!


Change settings according to the vinyl package and use the blue tip.  


Feed the vinyl paper shiny side up. 


Send the document to the Silhouette SD (just like a printer except that it has a blade that cuts) and it works it’s magic, cutting the vinyl just deep enough.  It sounds like someone playing pinball. I love that sound!


Next, peel away the negative/un-used part of the vinyl from the backing. 


You’ll see your vinyl letter/word/shape on the blue backing like this:


Now…cut a piece of the transfer paper to size.  Peel off the backing of the transfer paper.


Place over the vinyl letters.  Smooth into place.


Flip and peel the backing of the vinyl paper off.  (Your vinyl words might be all together. Mine are a little separate since this was my first time and it took 3 times to get good cuts. I ended up going with pieces. Don’t give up!)


Now letters are ready to be placed onto the jar. 


Place and smooth, using fingernail to make sure it’s sticking to the glass. 


Peel off the transfer paper. There are places where the jar is rounded, so tiny parts of my vinyl wrinkle.  I smoothed them out the best I could but I’m okay with imperfections.


Now, kitty treats are stored so much cuter than the original packaging. 


Exciting news!


SILHOUETTE GIVEAWAY Wed. 2/23!


~*~*~*~

Do you have a DIY project to show off this week?  I’d LOVE to see it!  Or please visit the links to get inspired!


The DIY Show Off


If you’d like to link YOUR DIY project post to The DIY Show Off Project Parade:

1.You must use the button above and link to this post to share the linky love.


2.Include your name or blog name and project title. Add your permalink (not your blog url, but your DIY project post url). Feel free to link a Past Post, just invite your readers in a current post with a quick note.

3.Or email your link to thediyshowoff@gmail.com and I will add it for you.


4.If you notice your link has disappeared -please add the link back to The DIY Show Off to your post today, a button or a quick note to your readers about the party and try again! I love when everyone participates and readers check out everyone’s links, but I think the return favor of linking back is the nice thing to do so everyone plays fair and enjoys all of the projects and links. Also – this blog party is for DIY projects only. Links not related to DIY will be deleted.


*I received a Silhouette SD in exchange for product reviews and tutorials, however opinion (LOVE) is my own. 


Tomorrow is the last day to enter the DIY Club’s monthly party!  The new rules make it easier for you to enter your project!  
DIY Club

DIY Project Parade

Valentine’s Day is nearly here.  Do you celebrate? We do in the way that I get spoiled with chocolate and flowers and gifts. 🙂
My sweetheart daughter wants a Valentine’s Day t-shirt, something cute to wear this week.  But, I’m still in my pajamas and not motivated to run out and buy something.  So, I take an hour of my time today and using my Silhouette machine and white heat transfer paper, I cut out a white doily design and whip up a cute Valentine t-shirt using an old red long sleeved tee. (My daughter ran out the door for an Ichiban Valentine dinner date with her boyfriend, so I’m modeling her t-shirt today.) This is the first time I’ve used it and I’m pleasantly surprised that it was so easy!

What is a Silhouette?

The Silhouette SD is an electronic cutting tool that connects to your computer allowing you to cut fonts and images in cardstock, vinyl, heat transfer material, etc.
I downloaded a design from the Silhouette online store. My daughter wanted a doily and this heart doily was perfect.
Click the “send to Silhouette” button on the left upper hand side.
Amazing – it cuts out the intricate design!
Change the settings according to the instructions on the heat transfer box.  
Install the blue cutting tip. 
Feed the heat transfer paper (shiny side down) using the “enter” button.
Click “cut page”.
Now peel off the negative space (in my case it’s white rubbery paper) from around the design, from off of the clear vinyl.The design will still be on the clear vinyl. Some of the hearts came completely out (white transfer + clear vinyl but this didn’t affect the finished project).
Place the design sticky side down onto the t-shirt in desired position. 
Heat iron to cotton setting.  Cover vinyl transfer with a cloth – I used a pillow case. Apply pressure all over, recommended 45-60 seconds covering the entire transfer.
Peel off the clear vinyl. If the transfer comes with it, put vinyl back in  place and iron again.
Peel off the entire clear vinyl.  All done!
Super quick and easy, so cute!
The Silhouette can be used to create scrapbooks, cards, home decor, custom apparel, school projects, glass etched projects, stencils, etc.

If you have a DIY Valentine project – feel free to share it at the DIY Valentine linky party or visit the DIY Valentine party for some last minute creative ideas.
~*~*~*~

Do you have a DIY project to show off this week?  I’d LOVE to see it!  Or please visit the links to get inspired!


The DIY Show Off


If you’d like to link YOUR DIY project post to The DIY Show Off Project Parade:


1.You must use the button above and link to this post to share the linky love.


2.Include your name or blog name and project title. Add your permalink (not your blog url, but your DIY project post url). Feel free to link a Past Post, just invite your readers in a current post with a quick note.
3.Or email your link to thediyshowoff@gmail.com and I will add it for you.


4.If you notice your link has disappeared -please add the link back to The DIY Show Off to your post today, a button or a quick note to your readers about the party and try again! I love when everyone participates and readers check out everyone’s links, but I think the return favor of linking back is the nice thing to do so everyone plays fair and enjoys all of the projects and links. Also – this blog party is for DIY projects only. Links not related to DIY will be deleted.

I received my machines from SilhouetteAmerica in exchange for reviews, to share tutorials and participate in future giveaways. YEP – giveaway!  Coming soon!  🙂