Karol from Home Sweet Home Inspiration is sharing an awesome idea for an outdoor shower. She makes it look so easy, especially since it’s hooked up to a garden hose. I love it! Here is her post:
Outside Shower DIY “How-To”
 Here’s a quick step by step how-to for putting up your own shower. No plumber, electrician, handy-man, or building inspector needed. Just a list of things you’ll need to get, a couple of tools, a few tips I’ll share and about an hour of your time to put it all together.
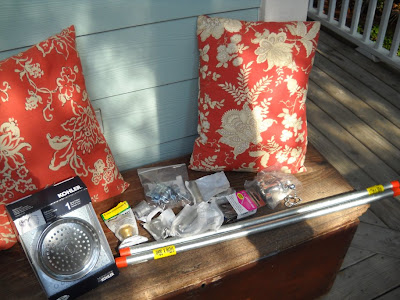
Showers like these can be installed right outside your mudroom entrance (if you are lucky to have a mudroom) or on your porch, or wherever you want to rinse off before going inside. Near an outside water spigot is ideal since this how-to is for hooking your garden hose to it.Below is a list of parts you will need. I went to Lowe’s and purchased everything I needed. The person in the plumbing department helped me find every single part I needed and even showed me how to piece them all together. I wish I had written down her name. Next time I am there I am going to thank her for being so helpful.
A few things I want to specify.
- I wanted my shower to be all metal/silver colored. But you can use pvc pipe or there’s even a black pipe and if you want to get really fancy, copper! You can get all the fittings, shower head and lever to match. Can you imagine all black or all copper on certain homes? …gorgeous!
- You can use whatever type of shower head you would like. I wanted the rain shower type, but you can use a regular one or even a handheld one -which might come in handy for rinsing things off or even washing a dog.
- There are different types of valves you can use, too. I wanted the pull chain kind because I wanted to be able to leave my water hose on and have the shower work whenever we pulled the lever. And I didn’t want it to accidentally get left on so the pull-chain type valve works great because it shuts off when you let go of the chain. But you can also get the kind that you turn on and then turn off. Again, it’s up to personal preference and needs.
- The two most expensive parts are the shower head and lever/valve. If you can, shop around for the best deal on those. Everything else is very inexpensive.
- Ok, now on to the supply list.
- (2) 1/2 inch in diameter sections of pipe. -two sections because the water valve goes in between so decided how tall you want your shower to be. I bought (2) 31″ sections (the ends are already pre-threaded).
- (2) 90° -1/2 inch pipe elbows
- (1) 1/2 inch pipe coupling
- (1) 1/2 inch brass hose bib
- (1) 1/2 inch x 3 inch pipe nipple (a pipe nipple is just a short section of pipe with threads at both ends…just like the large pieces of pipe listed above)
- (1) 1/2 inch x 6 inch pipe nipple (this is the section of pipe that determines how far out from the wall the shower head will be so choose the length you prefer).
- (4) 1/2 inch 2-hole pipe straps
- Exterior stainless wood screws (if attaching to wood, which is most likely)
- Thread seal tape
TOOLS
- Wrench (for tightening pipes together, but thread seal tape also helps assure a good seal)
- Screwdriver to attach pipe straps to wall or post or whatever you are attaching your shower to. (preferably an electric or cordless drill or screwdriver which required less “elbow grease”).
INSTRUCTIONS
Below I will explain how to put everything together (with pictures). I started at the bottom since the shower head should go on last (easier to handle and work with without shower head on).
- First let’s put the seal tape on the pipe threads. Wherever there are threads, apply some seal tape. Seal tape is not really tape but a super thin plastic strip that is stretchy and clings as you wrap it around the pipe threads. Wrap around a few times. This seals the pipes and fittings together better so there are no leaks. (Above) is what it should look like after you put seal tape on pipe thread (sorry for blurry pic).
- Next, let’s put some parts together. Attach the water valve to the bottom pipe. Turn as hard as you can to assure a tight seal. You can even use a wrench if needed. *If using a pull-chain valve, be sure you have the lever going the right way so if you turn it one way for on and one way for off. The pull-chain valve I bought works either way pulling up or down and rests in the middle for off. If it is the kind th
at turns one way for on and way way for off you might want to make sure you have it the correct way and on the side you want it on, too. It’s mostly preference on that.
- Then attach the upper pipe to the other end of the water valve and turn to make a tight seal. Again, use wrench if needed.
- Now to the bottom pipe end attach the coupling and then the hose bib. Tighten as tight as you can get them. Especially the hose bib. (they tend to leak if not tightened good). The hose bib is what you attach your garden hose to.
- Now we will work on the top part of the shower. Attach one of the 90° elbows to the pipe. Then attach the longer of the two pipe nipples to the elbow. As usual turn as tight as you can get it, but also so that the elbow is facing straight out (this is important!) away from the water valve so that the shower head is centered and out in “front” of the shower unit. If it is not completely tight, but you have it straight out in front like it should be it will be ok because you put seal tape on the threads.
- Attach the other 90° elbow.
- Attach the smaller pipe nipple.
- Last, attach shower head to other end of pipe nipple
Now assembly is all done. Be sure shower head is positioned straight and water valve as well and you will be ready to attach the shower to post or wall.
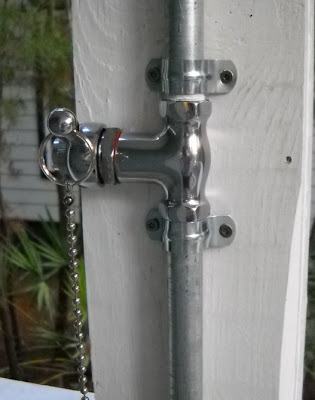
- Attach shower using pipe straps and screws. It is good to place a pipe strap at each joint. I put a pipe strap above and below the water valve at connections (see pic) since there will be a lot of pulling on this part with the water valve. I used 4 straps total.
- Last, attach your garden hose to the coupling at the bottom and tighten as tight as possible. Then turn on the spigot and give your shower a try!
Thanks Karol! This is such a great idea! I’m forwarding it to my mom. I think it’s a great idea for her patio/pool!
——————-


omg gorgeous! makes me think of summer hot days! i love this so much! thanks for sharing
Chiara @ mylittletiara.blogspot.com
Love this! Outsoor showers are one of my favorite things about going to the beach.
totally seems doable seeing the pics! How much better is that then getting hosed down by the garden hose! lol
Kim @ http://frostmeblog.blogspot.com
party inspiration
oh wow! I am definitely going to have to do this on my patio next to my pull to rinse all the chlorine out of my hair! You're a genious! Have a great day! ~andrea
I've been wanting to do this. Thanks for the how-to. I'm saving this for a few weeks when the weather gets better here.
If you have a pool, that is a wonderful thing to have! Wow, she is talented. Thanks for sharing.
What a great idea, I love it!
Hi There!, I joined as a follower and I have a new blog starting up called Tools Are For Women Too! I hope you will drop by. I would also like to put your party on my Link Directory, if you will also link to my mine. Let me know if you are interested. Thanks, Rory
What a cool idea! Makes me wish I had a pool. It looks great!
That shower is something we definately need living on land where the kids play in the pong and dirt and sand. Thanks for sharing. I stopped by to say thank you for stopping by my garden whites for White Wednesday.