I still have 1 wall left to paint and a lot of other things on my list, but I wanted to show you a sneak peek on how it’s going because I am in LOVE!
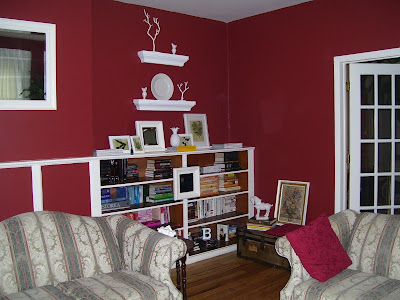
Here is the before:
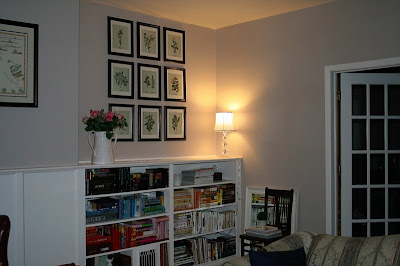
And here it is NOW!
I painted the panels (there is another smaller built-in book shelf to the left of those panels) and I painted inside the built-in shelving to match the trim (BM Half and Half – which I think is a discontinued color! Good thing I have some left over!). Oh! And does anyone know the difference between board and batten and wainscoting? It’s about 4 ft. high so my guess is wainscoting? Which is it between my bookcases? ??? Google wasn’t helping me or I just was just too tired to look beyond a quick look.
Today, I picked up 9 matted frames at Michaels (30% off of 9.99 ea.) and printed the botanical prints from vintageprintables.com (great site!). Even WalMart’s framed botanical print set of 4 was $278! I paid less than $70 for 9! SAVING OVER $200 and I like mine better! I printed them on cardstock that I already had at home and used a glue stick to keep them in place in the mat (gluing around the edges and securing the print to the “fake picture” that comes with the frame.)
Also – at vintage printables, I clicked the picture I wanted, highlighted it and right clicked to copy. Then I pasted it in a Word document(margins set at .5 all around), right clicked again to resize at 10.5 height. Then I dragged the right margin to about 7.45. This allowed the print to fit perfectly in the matting.
9 picture frames with all of these little metal tabs on the back = sore thumb and fingernails pulled. OUCH! DIY doesn’t have to be torture! Instead, I use this plastic card to pull them up and push them back down. Very easy!
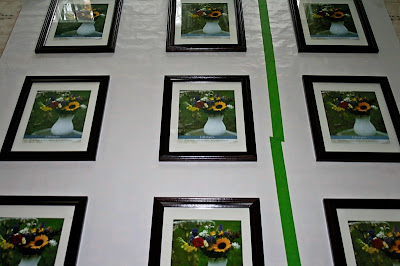
I laid out my frames on paper (back side of wrapping paper) and marked where the hanger is on the back (I made a separate frame pattern and marked where the nail needed to go). These look black but they’re a mahogany color. I debated about getting a lighter color but I love how these look on the smokey taupe wall.
I used tape behind the paper where the nail needed to go in since my walls are a plaster night mare. I learned the hard way that nails and plaster walls aren’t compatible. Lots of crumbling. But! The tape worked like a charm along with the small, very sharp, black nails. The tape kept the wall from falling out in chunks!
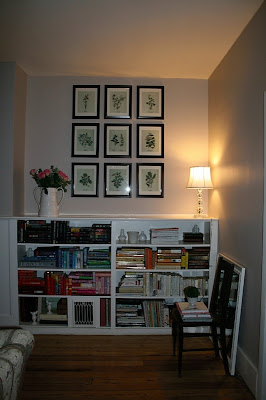
Here it is again! Yes – that’s my Valentine’s day dozen roses from Mr. DIY! AWE!!! And the lamp was brought in from another room for light since it’s dark now and there is no overhead lighting here. I’m looking for lamps for this area and I want to go through the big mess of books. There are way too many that we’ll never read again (lots of handy-me-down romance
novels, etc.). I can’t wait to clean it up and accessorize!
novels, etc.). I can’t wait to clean it up and accessorize!
More to come!
So, what do you think?


Love the change! I'm currently trying to lighten everything up in my home as well. It looks fantastic and I love your botanicals.
I'm loving it so far! And, it is board and batten that you have. Check out this link to see more about it: http://www.remodelingguy.net/2010/01/rgs-complete-guide-to-wood-paneling-part-3-board-and-batten/
Good luck with the rest of your project!
The color looks great! It actually makes the area look bigger!
Your pictures look great! That is a handy tip on the hanging of them – using the paper and all.
I use an old fashioned can opener (with rounded edges)for those metal tabs on the back. Works nicely and saves the fingers.
I am enjoying following your blog and would love it you care to follow mine! Good luck with the rest of your project.
Ooooooh! Well Done! I know you are pleased!! ENJOY!
Hugs, Lisa
OMG! Gorgeous! You have got such a great eye! I may have to copy this… 🙂
It really opens up the space!
I love how you showed how you lined up the nails. That part has always scared me away form photowalls like this. We have to drill in our walls to be able to hang something so there is no room for error. Love your wrapping paper tip!
Lookin' good! Can't wait to see the big reveal.
An amazing change! I just love it. The room seems so much brighter and I love your choice to put together the prints in that pattern. Neat and crip looking. Very nice!
I have to know? Did it take 2 or 3 coats of paint to cover the red? Because it did us. We had red in one room and dark blue in another and it took primer and 2 coats of paint until you couldn't see it bleeding through any more! OY!
But I LOVE the new color you have and the pictures.
You did a fabulous job!
Hugs
Kim
Love the change! It looks so soothing and refreshing with the new color. The prints are gorgeous you clever girl you!
According to my contractor husband board and batten is just that board and batten. There are different types of wainscoting which is usually at chair back height. I had a gentleman tell me when I was researching older homes that wainscoting was used to protect the lower part of the wall. It gets the most abuse. So traditionally they would put wood here which was more solid and plaster above since people considered it not as durable. Wood was also cheaper than plaster so you found this in more affluent homes. The wainscoting was also stained not painted. I was under the assumption that wainscoting is not at one set height. It can be higher than the traditional 4'. I dunno. Now I am off to do some research on it.
Yeah! I found the answer!
During the early days of house construction, interior walls often suffered from a wicking effect called rising damp. In an effort to reinforce the lower third of the wall and create a bit of camouflage, builders added wooden panels called wainscoting. These tongue-in-groove wooden slats extend upwards from the baseboards and end anywhere from three to eight feet up the wall. The top of the wainscoting is capped with a piece of molding to prevent a chair from damaging the wall. The effect of the dark wood against the lighter plaster wall also provides a pleasant visual contrast.
I found this on a contractor site. So you do have both wainscoting in a board and batten style instead of the tongue and grove like it stated.
The frames look great! Sometime when people do the multiple frames, they can't get them lined up right and they look ridiculous, but yours look perfect!
So far so good! The new color is doing wonders to modernize the space, and I like that the gallery wall is a more balanced display than the shelves – they seemed too small. Looking forward to seeing more!
Thanks everyone! I also used a level to make sure my dots on the paper lined up level.
I love Benjamin Moore paint. It did take 2 coats to cover the red but it's my experience that even when painting over a light color and using other brands it takes two coats. However – I think if I would have used a less expensive paint, it would have taken more. So quality paint was my #1 option. 🙂
Now I can't wait to get the rest of the projects done. One of them requires Mr. DIY's help and that of a family friend so hoping I can get them on board soon!
Have a great weekend!
Roeshel
THE CHANGE ROCKS! I love it so much more!!! so fresh vibrant updated all of the above. Love the wall grouping, you have done a great job!!! way to go!
I like red, but I'm sure it'll be sooo much more relaxing to hang out in this room when the walls aren't as….loud? Lovely. And just in time for spring too. Whenever it decides to finally get here.
p.s I'm dying to come on over and paint your french doors. They are begging to be black.
Wow Love this so far – so pretty and comfy looking.
Love the pictures on the wall and how ingenious you were to print them.
Can't wait to see more.
Roeshel, it's looking Fantastic!!
I'm sure that it's been a ton of work to cover that red, but it looks great! So was this a one woman job, or did Mr. DIY wield a paintbrush too? 😉
Is it totally weird that I kinda like the bookshelves the way they are? It's weird. It just seems real to me. Lived in. Like people inhabit the room and really read them, ya' know?
Maybe it's because I'm lazy and I don't like to reorganize my bookshelves when they get messy. haha.
Have a fantabulous weekend, girlie!
XO*T
Fantastic job Roeshel! That color is beautiful in there 🙂
Don't even get me started on hanging pictures on those walls LOL
Happy Valentine's Day!
rue
Thanks ladies! There's nothing better than getting positive comments after hard work – it makes me smile!
Tricia – Just me alone painting! I still have one wall left to do. I did each wall separate (doing the 2 coats on each) this time instead of entire room 1 coat then 2nd. Mainly because the tv is mounted on the last wall above the fireplace and it's the wall with 2 windows. The sun sets on that side too. So it seemed less disruptive. I do have a project for him though and hope to get him on it by next weekend!!!
Outstanding!
That looks great. I am definitely going to have to check out the vintage printable site–I have 5 empty frames hanging on the wall begging for something 🙂
What an awesome transformation! You've done a really good job!
Nancy
Beautiful!! Love how everything is turning out and those botanical prints are gorgeous! Can't wait to see more. I am in the middle of the remodel life as well and get excited every time something else gets finished. Have a wonderful weekend and Happy Valentines day to you!!1
Hugs,
Victoria
Great improvement. Love the lighter look and the way you placed the pictures on the wall. Looks much more like the coming spring than the red Xmas walls ;-)… Cool transformation!
Oh my gosh! I love it so much! Is that a very pale grey you used on the walls?
I need to redo my living room, and I haven't yet decided on colors
Your room looks so good! And thanks so much for the link to the print site – I will definitely be using that!
The lighter paint looks beautiful! I love the botanical prints. Thanks for the link to your source.
I am passing along the Happy 101 Award to you, you can check it out here: http://pugsnotdrugs.wordpress.com/2010/02/13/if-youre-happy-and-you-know-it/. Share 10 things you love and 10 blogs you love and want to pass the award to!
LOVE it !! The change is beautiful … very refreshing !! I love the botanical prints, too … and am so impressed at how perfectly they are hung !! Great job.
I love the clean lines, very pretty 🙂
It's shaping up beautifully – I love the prints and am a big fan of BM paints!
Your new color is great! Fantabulous!
Cindy at Lakewood
What a huge change! Vintage Printables is such a great site, isn't it? Good luck with the rest of your room. I just wanted to let you know I linked to this post on my blog today. Love your site!
My post:
http://welcometoheardmont.com/2010/02/vintage-printables/
Beautiful! The prints really bring your eye in! Love the lighter hues in today's decorating. I've done the burgundy room in the past too. 🙂
Thanks for linking up to SNS!
FJ Donna
Love the books-and-botanicals combo! 🙂
LOVE the new color and the botanicals turned out awesome! Great job. Have a good week…
Yay!!!! It looks sooo good, Roeshel!!! I knew it would…you rock! The Smokey Taupe looks lighter on your walls…so soft and pretty. Such a great idea to paint that part to the left of the bookcase white. Looooove the grid of botanicals of course…what a perfect spot for it. I'm going to have to check out this vintage printables site, awesome!!! Can't wait to see how you work the rest of your magic in this room!!!
LOVE, LOVE, LOVE IT! The botanicals look so pretty, and the wall color is beautiful. You've also accessorized the shelves so nicely. laurie