Patio Season {small updates}

I love that the weather is warming up! We have a patio off of the back of the house which we utilize as an outdoor room in the spring, summer and fall. We spend a lot of time in this space, weather permitting. It’s not a pretty sight by the time winter ends. Blah! The Lowe’s Creative Ideas challenge this month is outdoor mini-makeovers. Perfect timing!

patio update

Trip down memory lane: When we purchased this house, we installed two sets of French doors. There were concrete sidewalks with ramps to the old ‘single’ doors. When we bought the house:

house-before

A few years ago, we installed a concrete patio

concrete-before-after

but we never replaced the siding where the old ramps were located. (I also address the dirty concrete. Keep reading!)

missing-siding

I headed to Lowe’s with iphone pictures and measurements. The Lowe’s associates were super helpful in directing me to the siding supplies, advising what I’d need: a “J-channel” to match up/attach the vinyl siding. They even provided tin snips and a tape measure so I could cut it to fit in my vehicle.

j-channel

Installing the J-channels was easy, just nail into place. Then we just  a close-matching piece of vinyl siding (“heather”, also available at Lowe’s) and snapped it into place.

installing-vinyl-siding

Finally! No more embarrassing eye sore of missing siding…it’s those little things that really bother the home owner more than anyone else, ya know and one that is so surprisingly easy and cheap, I’m wondering why we put it off. Hopefully with some age, it will blend in even better.

before-after-siding-fix

I moved all of the furniture and gave the concrete a good scrubbing (water + Krud Kutter). It cleaned off the surface dirt and mildew but not rust or grease. However, it looks a much brighter!

scrubbing-patio

I used spray paint to freshen up some existing decorative accents, planters and a ‘grill cart’ and added some colorful flowers to planters and window boxes.

patio-accessory-update

Some new things available at Lowe’s:

Outdoor area rug defines the cozy seating area…

patio-makeover

Love this umbrella candelabra (misted with Rustoleum’s “Lagoon” spray paint to match other accents) and beautiful fat hanging flower baskets…

umbrella-candle-holder

The sun sets on the other side of the house. Sometimes evenings are chilly. This wood burning firepit is perfect for a little heat (and roasting marshmallows)…

firepit


Cutest decorative owl candle holder…

owl-candle-holder

When it’s warm and not raining, I start my day with a cup of tea here. When we entertain small groups and it’s warm, this is the party location…lots of family dinners/cookouts and since it’s right off the kitchen, hosting and clean up are super convenient. It’s also where we enter the house. Now it’s visitor-worthy, pretty and relaxing. C’mon over!

patio-before-after


BEFORE

patio-before

AFTER

patio-makeover

More pics…

patio-flowers

cocorosie


patio-makeover

patio-makeover

Next up for this space:

  • rearranging some of the furniture another time or two
  • pallet herb garden
  • canopied swing bling
  • patio pet bed
  • raised flower bed
  • grape arbor/gazebo path/patio is on the DIY list again (maybe this year?!)

Free Standing Pallet Herb Garden:

free-standing-vertical-pallet-herb-garden

Patio Swing Makeover:

how to add curtains to a patio swing


Sharing at Project Inspired.

See more fun DIY ideas at Lowe’s Creative Ideas, follow Lowe’s on Instagram, Pinterest and sign up for the Creative Ideas magazine and app!

Spring 13 Blogger Badge Subscribe Banner Version

*Disclaimer: As a member of the Lowe’s Creative Ideas Creators and Influencers network, I received a Lowe’s gift card to complete this project for a mini outdoor makeover challenge, however the tutorial images, instructions and opinions are my own. 

Porch Floor Makeover ~ Home Repair Tutor

Good day, DIY’ers! Today I’m excited to introduce you to Jeff from

Home Repair Tutor blog

Like most of us DIY’ers, Jeff started working on home improvement projects on their home and rental properties in order to save money. He shares his knowledge and experiences with the hopes of helping others realize they can save time, money and DIY. I love that he shares his bloopers as well…a great “don’t do what I did” approach to learning.

Recently, Jeff researched the best products and ways to refinish a wooden porch floor and is sharing that secret here today!

Materials for stripping old paint (optional): 

  • Behr Stain & Finish Stripper
  • foam roller (One thing that makes reading enjoyable at Home Repair Tutor is that Jeff uses technical terms like “hot dog” roller! It throws you off for a minute while you giggle but you definitely know what he means!)
  • wire brush
  • tape/drop cloths to cover anything not being stripped (and to cover plants)

Materials for painting the porch:

  • 5 gallon bucket
  • 4 gallons of Restore paint (2 gallons will cover 100 square feet but you will need 2 coats)
  • paint stirrer
  • Restore paint roller kit that comes with a paint grid (some may say screen) for the 5 gallon bucket (Color shown below is Fieldstone)
  • 4 inch paint brush (cheapest available)
  • extension pole for paint roller (optional)
  • paper towels
  • painter’s tape/drop cloths to cover parts not being painted or to prevent splashing

Restore Paint materials

Tutorial:

How to strip a painted porch floor

Jeff started the process with stripping away the old paint in order to achieve an even finish by rolling on the Behr Stain and Finish Remover with a foam roller. He worked in 3-4 rows of floor boards then waited 5-10 minutes before etching the boards with a wire brush. After finishing about 5 square feet of wood, he carefully used a hose to spray off the excess paint and repeated this process until the entire porch was done and let it dry overnight. The next day, this is how it looked:

paint stripped porch

How to painting a porch floor

Pour about 1 gallon of Restore into the white 5 gallon bucket and stir with the wood stirrer to ensure an even consistency. Place the paint screen into the 5 gallon bucket then dip the Restore roller into the paint and move it back and forth on the grid to remove excess paint.The Restore paint roller covers are what provide the rough texture.

Restore Paint Roller Cover

Jeff’s technique for painting with Restore consisted of rolling the paint onto the floor boards with the roller in one direction, moving from right to left. He did cut in first using a 4 inch paint brush and painted the quarter round trim and any other areas that butted against support beams, etc. Moving on, he found that painting 4 to 5 boards with the paint roller then smoothing them with the paint brush worked best. He overlapped the paint brush strokes by one half the width of the paint brush to ensure a consistent & smooth finish. You can see Jeff’s Restore Project video for a better visual explanation.

Jeff states that you can choose to leave the rough texture created by the Restore roller or smooth it out using the brush like he did. He chose the smoother finish over the concern that dirt and grime may get trapped in the textured surface.

The final feel of the Restore paint is grainy and it definitely did an awesome job of making the wood boards more even. There is absolutely no splintering poking through the two coats (recommended by the manufacturer and Jeff).

After one coat:

First Coat of Restore

After letting the paint dry for 24 hours, apply a second coat.

After two coats of Restore paint…

Restore After Second Coat

Once again, here’s the before:

Paint Stripped PorchA freshly painted, slip resistant surface after:

Restore After Second Coat 2

Tips:

  • This does seal the spaces between the boards and rain water will puddle. Best used on porches with a slight downward pitch.
  • Remove painter’s tape as you finish sections. Otherwise, it may be permanently stuck if painted and allowed to dry.

Project cost: $150 (and lasting more than the usual two year period of other finished outdoor areas)

Time involved: Approximately 7 hours (*includes paint stripping time and applying two coats).

Pretty awesome, right? It reminds me of our brushed concrete patio. The Restore paint comes in a variety of colors and is a great alternative to staining. Love the texture. Now…if only I had a outdoor wooden area to paint, this would be my preference. With a stencil involved in those steps. haha!

~*~*~*~

Thanks to Jeff for sharing his helpful porch painting tutorial and Restore paint review! See more of his projects at Home Repair Tutor. (I spy some bathroom tiling tips that I’ve bookmarked for an upcoming project).

I have to tell you that I’m always excited to make new DIY friends around the world wide web. I recently learned that Jeff is local geographically to us. Woo hoo! Another Steeler fan (well, for Mr. DIY since I’m not really into football other than being in the same room while the game is on). But the best part?! If I hit a snag with the apartment renovation, guess who will be getting a call? Be careful when you say “If I was local, I’d totally be helping you!” You just never know who might live next door!

$100 gift certificate to Empire Covers Giveaway

THIS GIVEAWAY IS CLOSED. Winner is

Rayan on  said:


i follow them on twitter


You’ve seen pictures of our uncovered patio in the summer. But, yea for the purpose of this post and because it makes me happen to see it when it’s not covered in leaves and surrounded by brown grass and bare trees…

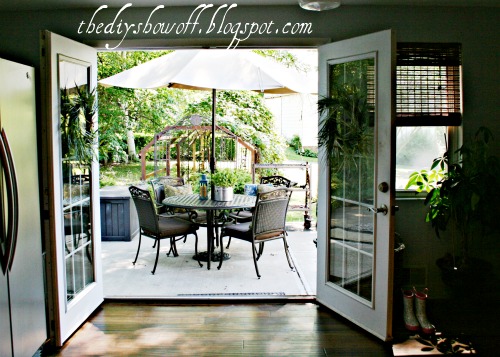
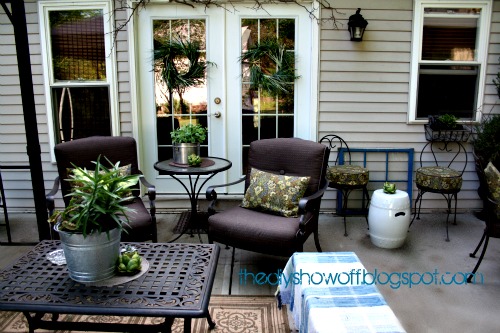
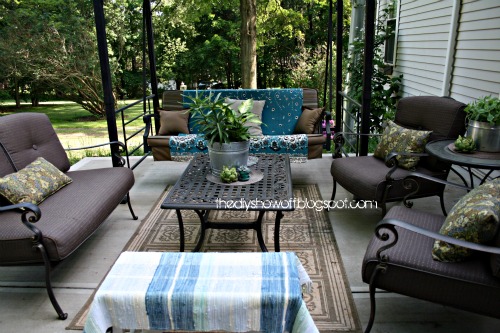
Oh, how I love summer! But what do we do in the winter or when it’s raining/not in use?  I store the cushions in plastic deck storage chests. But as you can see from this picture:

our patio furniture braves the winter elements, cold and naked and although cushions get protection, actual furniture does not. Patio furniture covers are a great solution for extending the life of patio furniture and keeping it warm. It’s the patio-friendly thing to do.

I’d love nice quality covers to help prolong wear and tear like these patio furniture covers:

And now, Empire Covers is offering one lucky DIY Show Off winner $100 gift credit towards covering their naked patio furniture! How sweet is that?

My favorite is the Metro Brown Stripe…. Protective and decorative!

GIVEAWAY INFORMATION:

  • Giveaway will runs right now through midnight EST Friday, 1/13/12.
  • Open to US and Canadian residents only.
  • Prize = $100 credit to EmpireCovers.com. (Lucky!)
  • Winner will be chosen by random.org on 1/14/12 and announced shortly after.
  • Be sure to include your email address in an entry above if you can’t be reached via your profile.
  • Disclaimer: I am not receiving compensation for this post. I’m making an introduction and sharing this product information in my own words in the event you find it helpful and in exchange for prize donation.
  • HOW TO ENTER:
  1. Visit empirecovers.com and comment what you’d choose if you win.
  2. “Like” Empire Covers on Facebook. Comment that you like Empire Covers on Facebook.
  3. Follow Empire Covers on Twitter. Comment that you follow Empire Covers on Twitter.
  4. Since Google Friend Connect is going away in March, add me on Google+ to stay updated (button on right side bar). Thanks!
  5. Share this giveaway link (https://diyshowoff.com/2012/01/100-empire-covers-giveaway.html) by tweeting (include @diyshowoff), linking to the giveaway on Facebook or by including a link in your latest blog post or +1. Buttons below this post provided for your convenience.  Leave one comment for each way you shout it out.

Your patio furniture told me to tell you to enter this one! Good luck!