 Hi DIY-ers! You’re in for a treat. This DIY project is one of my favorites. It’s stunning, so creative and an amazing DIY transformation. I’ve introduced you to
 before with her gorgeous DIY Chandelier tutorial.
Remember?
Well…she has more budget friendly tricks. Make sure you visit her blog, click her DIY label and be prepared to be inspired and become a follower. Because the beauty she creates is something anyone can do.
Her DIY wallpaper is gorgeous. I love it even better than the pricey Farrow and ball wallpaper that inspired her to come up with such a creative inexpensive option.
Here is her post:
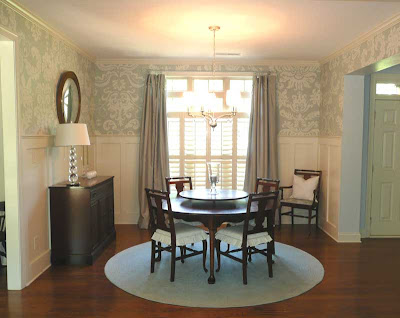
Dining Room Tour

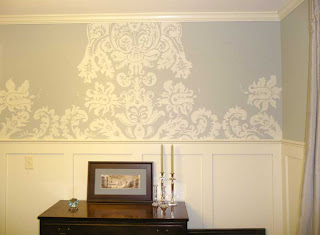
This is what the room looked like soon after we moved into our house in January:
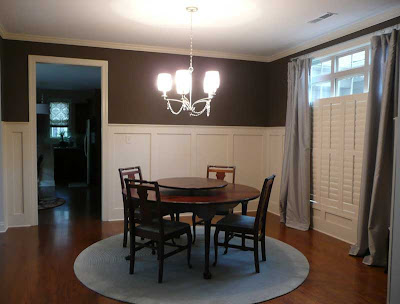 I loved the judge’s paneling, but I knew I wanted to go with a lighter, softer color, and that I wanted to do something a little crazy on the walls. After moving from house to house every 1-3 years for my entire life (my dad was military and you can read about our recent house-jumping here) I’m ready to put down roots and make a house my own.
I considered wallpaper and fell in love with “Silvergate” from Farrow and Ball:
 But at several hundred dollars for the rolls I would need to paper the Dining Room, I knew I had to pass it up. So I decided to paint an enlarged version of the Silvergate pattern on my walls. I started sketching and filling in with paint, and before long I had this:
 And after what seemed like an eternity of sketching, erasing, and painting, I finished! There are tons of imperfections in the pattern, but I’m holding my inner perfectionist at bay and trying really hard to ignore them. There’s no guarantee that I won’t constantly be touching up and “fixing” things, though. But for right now I’m happy with it.
And the total cost for the “mural” comes to $30! I bought 2 cans of Behr Interior Flat Enamel for $15 each on sale, but I barely put a dent in either can, so I will be able to paint other rooms with both colors!
Now onto the details:
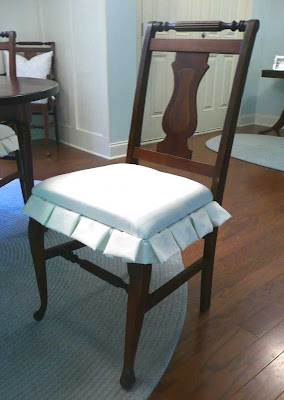 I bought this set of chairs at a yard sale a few years ago for $90 and recently gave them a facelift by recovering them and giving them a little pleated ruffle (check out the how-to here). I spent $8 on fabric and was given the foam for free, so the total I spent on these chairs comes to $98.
 The braided chenille rug came from JC Penney Outlet a year ago for $30!
The table came from an auction in Missouri about 5 years ago and was a whopping $25! Keith and I refinished it and now it’s one of our favorite pieces of furniture. Don’t you love the lazy susan?
 My mom very graciously helped me sew the drapes. The fabric was on sale at JoAnn’s for $2/yard and I think total we used 9 yards. We lined them with queen bed sheets that we found at Anna’s Linens for $6 each. I love how full and heavy they feel. Total cost = $30.
The shutters came from a yard sale a few years ago. My mom found several for $8 each, but when she got them home not a single one fit any window in her house. She held onto them, though, and magically, every one of them fits a window in our new house! They also happen to match the trim color perfectly.
The curtain hardware is from Ikea and cost around $15 for everything, including the glass finials.
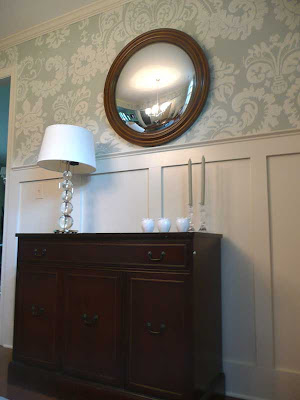 This buffet came from a yard sale in Illinois a few years ago and was $100. That’s a bit of a splurge for me, but this piece has been worth every cent.
The convex mirror came from JC Penney outlet a few years ago and cost $30. I had searched everywhere for one of these, but was always disappointed with the $100+ price tag, so $30 seemed like a good deal.
I just purchased the lamp with birthday money off craigslist for $20, and those cute white ceramic apples were $6 at a recent yard sale. The crystal candlesticks were a gift from my parents.
Grand Total for our “wallpapered” Dining Room = $392!
How She Did It
I have been asked to share my tips and methods for creating a mural like the one I just completed in my Dining Room.
This is really scary to me because I really don’t have a “process” or “methods”. As with most projects I do, I just jumped right in with a half-baked idea and no clue as to how I would successfully pull it off. So instead of sharing with you what I did, I will tell you what I should have done. Ready?
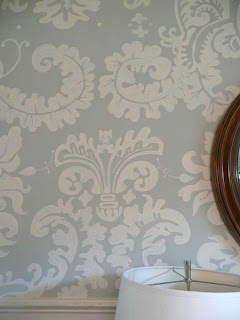
1. Decide on a pattern and colors. (I actually did this step!!!) Pick something that you think is classic and that you can live with for years to come. Look at wallpapers, fabric, art, magazines, etc. to find some inspiration. Mine was this wallpaper from Farrow & Ball:

Then decide which colors you want to use. I chose to only use 2 colors since the pattern was so busy: “Granite Dust” by Valspar and a custom match to the trim in our house, which I think is Sherwin Williams “Antique White”. Remember to think about staying power when deciding which colors and pattern to use – you don’t want to decide a year from now that you don’t really like your mural after all your hard work!
2. Decide how you’re going to transfer the pattern to the walls. You can free-hand it, get an overhead (check craigslist and rentals first!), make a pattern from cardboard to trace on the walls, or draw a grid on both your pattern and the walls and use it to sketch the design. I free-handed mine, but if I had been able to find an overhead I’m sure it would have gone much faster!
3. Lay out the design. (I skipped this step – oops!) If you have an overhead, a pattern or a grid, figure out how your design will fit on each wall. If you’re free-handing it, you can still try to determine where
how big your design should be, what should be centered on the wall and how the designs on each wall will meet. You may want to enlarge your design (I enlarged mine considerably) to make things easier and faster.
4. Gather supplies. Buy your paint. I recommend going with a low-sheen if you’re doing a more detailed design. I ended up painting over parts of my design and re-doing them, and a low-sheen paint hides the imperfections. You’ll also need a pencil or two, a good eraser, some decent paintbrushes of different sizes, and possibly a ladder and dropcloth.
5. (Optional – I certainly didn’t have the foresight to do this!) You may want to do a mock-up of your design on a piece of cardboard or wood. Practice sketching and different brushstrokes. Then hold the board up in your room to make sure you like the design and colors.
6. Paint your base color
7. Start sketching! Use whatever method you’ve decided to start transferring the pattern to the wall. Try to draw lightly so that your pencil marks will be more easily covered up by the paint. Keep in mind your layout and how you want your design to fit on your walls. If you mess up, just erase it! If it’s a pretty big screw-up (I had several of those) you can paint over your marks in the base color.
8. Fill in with paint. Try hard not to be a perfectionist. Just fill in your design and have fun. I personally like the look of longer, freer strokes, even if they are a little messier.
9. Go back with your base color and clean up edges and stray pencil marks.
A few tips:
* You may want to work in sections instead of sketching the whole design and then painting it all. This made it seem to go faster, and if you drag your project out over weeks like I did, it looks more finished to have a section or two completed instead of a whole room in progress.
* I am a big fan of Behr Interior Flat Enamel. It is very low sheen, but it is smoother feeling than most flat paints and it’s scrubbable. It’s also only $17 a gallon!
* Try not to choose a pattern with symmetry, especially if you’re free-handing. If I had taken the time to think about this before jumping in, I would have realized that my pattern required that my main wall be perfectly symmetrical. This made things very difficult!
* Don’t obsess over the imperfections. I’m working on this one. It’s hard, but the imperfections are what make it art.
* Consider doing this on one accent wall instead of the whole room for a “pop”.
Okay, pick your jaw up from the floor…are you as jealous as I am? I love the colors and the design. I love every DIY detail. I love that it’s not real wallpaper (for future changing – although I don’t think I’d ever get tired of looking at these walls). What do you think?
Britt – Your painted wallpaper is so much prettier than the one from Farrow and Ball and a HUGE impressive difference in price. Thank you SO much for allowing me to show off your beautiful dining room and inspirational blog full of DIY projects!


 I don’t know what your weather is like, but here in PA, it’s beginning to feel a lot like Autumn. It’s still August for goodness sake! But chillier temps (currently 59 degrees!) and a trip to Michael’s where Halloween and fall have already been on display for a few weeks = autumn on the brain. (I didn’t procrastinate this year!)

 3. I traced them onto my pumpkins. Using the actual number instead of stencil worked a little better since it’s not a flat surface. (I didn’t take a before picture…but this is pretty much what it looked like before. You’ve seen a faux pumpkin…kind of boring and plain.)
 4. I painted them using metallic craft paint. This took a couple of coats. Fun project in front of a movie since it’s time consuming and repetitive. I just did stripes on mine with house numbers since they’ll mostly only be seen from the road.
  5. After the paint was dry, I used a cheap, small paint brush to apply glue to the numbers.

 My daughter painted this one:

 Fall
Fall Watch for details next week relating to
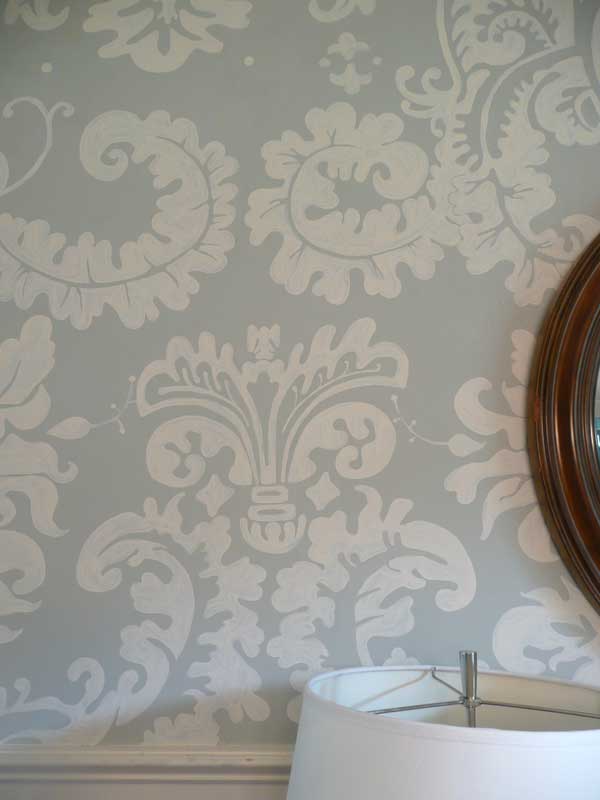


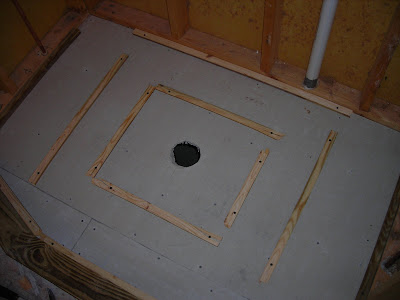
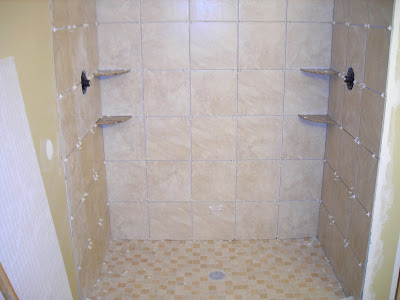
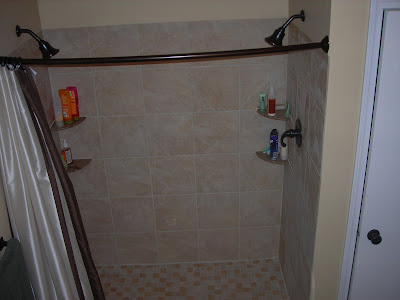
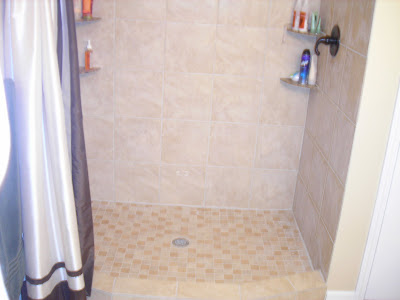
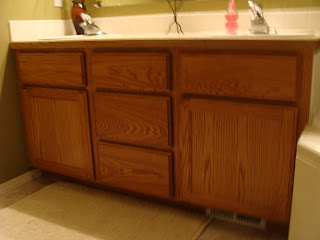
 There was a tub here with glass sliding doors, but we were so excited to get rid of it, that we forgot to take a picture while it was still in there.
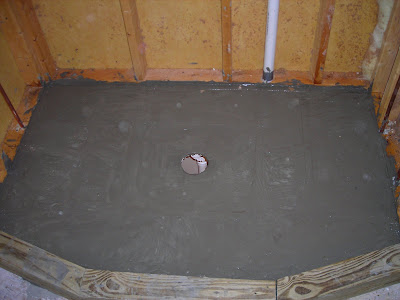
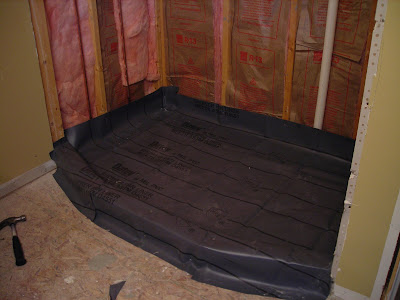
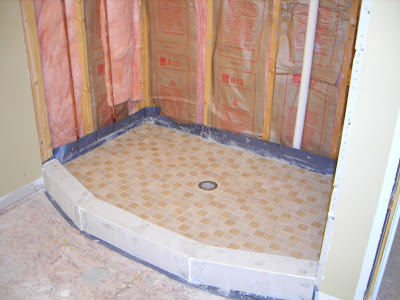
 DURING