


Painted upholstered chairs – story of an unplanned DIY.
Does your DIY ever go like this: I started my day with big plans to finally sew the curtains in the family room. In order to do so, I needed to clean off the dining room table which was piled with boxes filled with ornaments and holiday decor and other junk from the shuffling around, rearranging and decorating {because of course the table in my craft room is piled high with an unorganized cluttered mess that also needs cleaned}.

Of course clearing the dining room table meant decorating for Christmas which lead me to the room right off the dining room that we’re currently calling the “sitting room”. So, in order to sew curtains for the family room, I had to clean the dining room which meant decorating the sitting room and in there were these chairs.
These $6 thrift store chairs. I loved the color and pattern. But I have had a difficult time with orange, fuchsia and olive green colors. Love them. But they don’t work in our home. I gave them a chance, but not even in our eclectic home. I considered slipcovers but I am decorating this room right now. No materials or time for slipcovers.
{before}

And I had the brilliant idea to paint them. Right then. That minute.
I had seen the upholstery painting tutorial at Hyphen Interiors in 2011. Loved it. Left an impression. Very inspiring.
I also knew I had most materials on hand. Paint! Everything except the fabric medium. I’ve looked at the bottles for sale at Michael’s in the past {for painted curtains} and knew they weren’t cheap. I was also still in my pajamas and on a mission. Sewing curtains, remember?! But these multi-colored chairs were an obstacle.
DIY girls thoughts: No fabric medium. No budget. No desire to run to the store. Lots of leftover latex paint. The only one who really sits in these chairs is the cat. So for now…if painting doesn’t go right, I can still slip cover them at a later date. GO FOR IT!
I found a left over can of Ralph Lauren paint that I hated working with as it was super watery. Perfect! I watered it down even further with water. I didn’t measure, just created a consistency that was still able to hold to the paint brush but watery enough to be absorbed into the textured fabric of the chairs. I used a 2.5 inchPurdy brush.
I gave the chairs a good cleaning, getting up all of the cat hair (FrogTape works great as a cat fur remover).
And I just started painting. My mixture of latex and water had amazing coverage.
I also taped off the legs using FrogTape.

Sometimes I had to swirl the brush for coverage, then followed up with a straight brush stroke.

And worked my way along the bottom edges, up the side, around the back, in the creases of the attached cushions and finished by painting the seat back and cushion.

I took a few breaks and a bigger one between the painting the two chairs. The Paintbrush Cover was perfect for keeping my paintbrush from drying out. It creates an airtight seal during usage. Simply place the brush in the cover and close the lid. After my break, I simply opened the cover, removed my brush. It was like I never stopped painting! {Thanks to Salvatore of the Paintbrush Cover for the gift…definitely something that’s going to get a lot of use around here. If you paint a lot…visit the link above to purchase a few for yourself. Definitely useful and convenient! 2 must have DIY paint tools to have on hand: FrogTape and the Paintbrush Cover.}

One coat. It dried fairly fast. I removed the FrogTape which perfectly protected the wooden legs. Who even noticed those pretty legs with that crazy printed fabric before? Discovery: She has legs with beautiful carved detail!

The texture which was lost in the busy pattern…
before

now shows the quilted pattern with a solid color…
after

SO PRETTY!
And before you ask, yes…without the fabric medium, my chairs are rough. They have a vinyl look and feel. Since the paint is watered down…it’s not going to crack or chip or anything. The paint is absorbed into the fabric. I would recommend NOT skipping the fabric medium and to use the recipe shared by Hyphen Interiors. However…if you find yourself in a DIY emergency like me and aren’t particular about a sort of vinyl look/feel. And you have to do something or your entire Christmas decorating is going to be a big fail and you’ll never move on to the project that you planned to complete in the first place…I must tell you, I love these chairs now. Forget the slipcovers.
I knew I wanted to do more than just have a set of solid light grey chairs. My inspiration:
Serena & Lily Bark Miramar Racing Stripe Chair

Of course I know that my chairs aren’t the same shape. They’re slender girls with long legs. But that stripe. I love that stripe. Not quite a knock off or copy cat project, but it’s what inspired my next steps…
I found the center of the chair and using FrogTape, created a stripe down the middle. I was sure to burnish the edges where the tape would meet paint. And using leftover {watered down} brown latex paint, I painted in my stripes from bottom of the front of the chair, over the cushion, up seat back and down the back of the chair.

I removed the FrogTape while the paint was still wet, pulling away from the wet paint. I did take a wet paper towel to carefully wipe away wet paint where a tiny bit seeped under the tape due to the texture of the fabric. See – it’s a good thing I have that vinyl-ish finish!

Amazing transformation, right? Love it!

Now I’m happy with my $6 chairs.And I was able to decorate the sitting room for Christmas.
See more Painted Upholstery Chair pictures in the sitting room mini makeover.

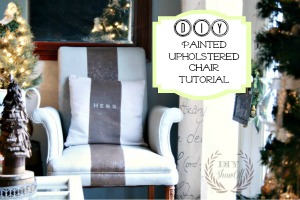
His & Hers painted pillow covers

{tutorial}

I was able to get the dining room table cleared off and decorated and the clutter put away. (okay…for real, some of that was shifted to the craft room table which is dangerously close to an avalanche. Shhhh!)
I still haven’t sewn 6 of the 8 family room curtain panels. {Remember the no sew ruffled ombre tree skirt and the sewing machine being at the repair shop? One of these days I’ll get those curtains done. You don’t remember that I’ve had the fabric since June, do you?}
Perhaps another day, I’ll have a DIY plan that will go according to plan.
Joining the party here:


Don’t miss a thing!


![]()

*This is a sponsored post brought to you by FrogTape. The opinions are completely my own based on my experience. Results may vary.
![]()
Bam! Out of the park again girl!! Love the chairs!!
The look awesome! I love a risky plan that works out 😉
I love how they look painted! The broad stripe is wonderful. And to have matching pillows…nice! I have two chairs I recovered but I’ve been pondering adding some type of stripe or stencil design to give them more interest. All these painted chair projects give me hope that I won’t have to recover them as well. Thanks Roeshel! Your room looks beautiful.
Wow! What a transformation! They look like completely new chairs. {And your sitting room looks super cute all decorated for the holidays. :)}
This looks fabulous! Great job, I have a chair I’ve been planning to paint, you may just have nudged me a little bit. 🙂
I love this makeover! Who would have thought! Thanks for sharing with us.
XO
Kristin
Amazing! A great transformation and I’m blown away that you painted them!
Leslie
Wow! Now this is soo creative! I LOVE the new look! You’ve inspired me to not only decorate this year but also rearrange and put legs on two sets of shelves.. Now if I can only find legs with 5/16th screws in them! HAHA Thank you for inspiring me!
love the new look of the chairs (the fabric was pretty cool before…but I can see how they wouldn’t work in most spaces!)!
The chairs look fabulous. I love the idea of the stripe and you can’t go wrong with your colors. Great legs too. Everything looks wonderful. Hugs, Marty
Roeschel; Awesome!!! The fabric looks like a high end matelasse and what a find. I need to start shopping where you shop. Heather
I love the chairs!
So awesome!!! I LOVE the stripe down the middle!
–Katie
ha, that sounds just like most of my days! Well, the days I actually do anything! You must be reading my mind, because I have a chair from a local thrift store that I’ve been contemplating painting the fabric. Phooey, I was hoping I could get away with latex and no medium. I’ve also been looking at the fabric spray paints, but not sure how far one of those little cans will go.
Oh, and I love your chairs, especially that sassy stripe down the middle! 🙂
Roeshel this is such a gorgeous end project. I can’t believe how amazing the chairs look now. The stripe down the middle is perfection 🙂 The whole room looks marvelous now!! You killed it!!
Brilliantly salvaged!
Pingback: Progress Thread: The Paint Brush Cover - Page 20
lovely! But one question: what does the paint feel like on the chairs, and (I guess i had two) will the pant chip off?
Thanks, Tara. Like I say in the post, since I didn’t use fabric medium, my paint does have a rough finish but I do not believe it will chip since the paint is absorbed into the fabric, not coating the top. There is a link to Hyphen Interiors where she uses fabric medium and a layered technique which I think she says is softer. Also do a Google search on “painting upholstered” fabric for further detailing. Good luck!
One word – STUNNING! I absolutely love that you got these chairs for $6 and that you painted them!
I can totally feel your pain about how one little thing is actually a 20 step process….. and we won’t even get into the whole craft room thing either ;). Mine could be used for the Marines basic training camp.
These chairs are really cute! I’ve thought about painting chairs too….when I find some seriously cheap cast-offs 😉 As for the vinyl feeling of them now, hey now it’ll be easier to remove cat hair. It’s all good 🙂
Roeshel,
I’ve been wanting to do this forever, just haven’t found the right “victim”. 🙂 I too plan to just use latex paint, just because. LOL
Love your chairs, but the addition of the strip and the pillows really makes this a show stopper! way to go girl!
pinning!
gail
Pingback: Christmas in the Sitting RoomDIY Show Off ™ – DIY Decorating and Home Improvement Blog
They turned out great! Love the stripe. And, good for you just going for it – you did a great job describing the process. It’s good to know how it turned out without the fabric medium. Thanks for linking to my site!!
Roeshel, I added you to my chairs page – http://www.hypheninteriors.com/chairs under other methods since it was without fabric medium. So, you have to scroll down through the tons of examples to that section, but you are at the top there with a link back to this post. Thanks again!
Nice blog… thanks for sharing with us..
Pingback: How To Paint An Upholstered Chair | Rustic Crafts & Chic Decor
BEYOND AWESOME!!! SPEECHLESS!!!
lOVE!!!!!!
hUGS
Karin
Pingback: Looking back: 2012 DIY recap | | DIY Show Off ™ - DIY Decorating and Home Improvement BlogDIY Show Off ™ – DIY Decorating and Home Improvement Blog
Awesome job! I like your chairs BETTER than the inspiration! Thanks for sharing the tutorial with us! Have a blessed week!
LOVE these chairs, Roeshel! What a great job. They look like a million bucks!!!
I am absolutely in love with those chairs. I really like that they look leather-ish. Fantastic idea! Sometimes the best ideas are the ones we come up with in a split second.
Your “story” is hilarious. And well said. I can relate. I decided to attempt this -after reading your blog- to two big blue upholstered boys that fit no where in my home. The cats use them-so I too had to frog tape cat hair! However, because I look at entirely too many blogs everyday I forgot that you added water to your latex. I so far have only tested the section under the cushion (so my experiment would not be seen if failed miserably). I’m hoping I can water my latex down and still paint the rest without having already “ruined” my project. My only other issue is that the upholstery is a bit-how shall i say-cat clawed?? Apparently these chairs are good cat posts, and the paint went on a little weird in places as a result. Perhaps after watering down, I’ll have better luck! thanks so much for the inspiration!! 🙂
Roeshel, I don’t see it mentioned specifically, but did you wet the upholstery before painting? I’m thinking of using your method on a bedroom chair. I especially like the idea of not using the expensive fabric medium.
Hi Peggy! I did not wet the fabric and not using a fabric medium does mean that I didn’t achieve a ‘soft’ result. My chairs have a stiffer finish. Watering the paint helped immensely – the paint does not crack,peel or flake. It definitely transformed the look and feel but they’re durable. I’m extremely happy with the result. If you read other tutorials I linked to, you’ll see where some did wet the fabric beforehand. It might help with absorption.
This are beautiful! And, honestly, I like the shape of your chairs better. I was laughing out loud at your whole process, because that happens to me all the time (the distractedness of projects), and usually it’s the ones I didn’t even plan that turn out the best! I also have that weird compulsion that I must to get things done before certain events/deadlines… my husband thinks I’m crazy, so it’s nice to hear about someone else thinking the same way 🙂
Yep, you’re my hero! I thought I was the only person who got a wild hair to do something that totally wasn’t on the big list of “Things I will accomplish today”. I’m forever giving my furniture the side eye…and now I know I can do something about it! Thanks!
haha! I’m glad I’m not alone, Jessica! 🙂
I painted a loveseat, wing chair, and ottoman in the spring of 2006. Like you I figured that if I didn’t like it I’d resort to my plans to slipcover them. I didn’t use fabric medium either. What I di was apply several coats of paint and I sanded my chairs with a palm sander between each coat. Its been almost 8 years now and there are a few areas that are a bit crackled looking on a couple of cushions. I’m thinking of going back in and sanding them and applying a couple more coats of paint. Most people that come over and sit on them think I have an ivory leather set. Each piece was from a different manufacturer with a different fabric and you’d never know it now.
I have to say that I thought your DIY painted chairs were designer chairs you were trying to copy. Not until I scrolled down did I realize it was the opposite!! Fabulous results!!!
Annelie – what a sweet comment! You made my day! I’m so glad you stopped by. Have a great week! xo
I have to ask, what color of brown is that?! Good Browns are so hard to find!
Ugh, Tiffany! I’m sorry! I don’t remember. It was left over paint and this was done a few years ago. I am so sorry I can’t be more helpful! It is a beautiful shade of brown. I wish I still had the can to check.
Love this!!! I think I’m going to paint my couch! ♥️
At first, I thought, who would cover that incredible fabric with a solid color. (And white at that.) I went back to the before pic and noted that there was quite a bit of wear on the chairs. Something had to be done.
But I would have slipcovered them as a stopgap and saved enough of that incredible fabric; you could have made throw pillows at least. Or just saved the fabric to moon over.
Your faux “french” look will soon be dated
Thanks for visiting and taking the time to leave your opinion, Cecilia.
Have a great day!