


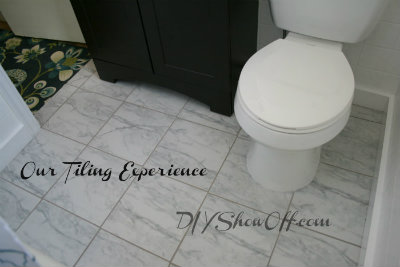
Apartment Bathroom Floor – before and after

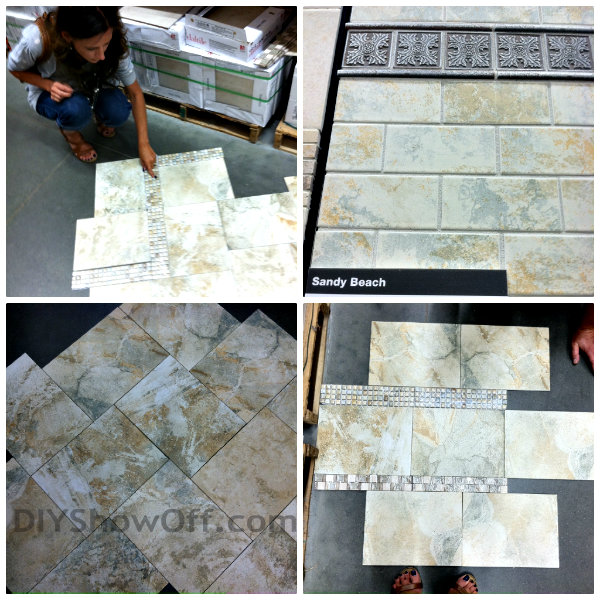
We’re renovating a tiny apartment on a small budget. We decided that the bathroom floor was a ‘must do’. The Atmospheres Tile Collection by Daltile offers a variety of style, color and size options, so you can create your own unique designs with tile. The possibilities are endless! Read more about
our tile shopping experience at The Home Depot
helpful tips and tricks from The Home Depot Tile Specialist

The old bathroom floor (updated by previous owners) wasn’t an ideal choice… 
And a leaky valve created a HUGE mess (more about that in another post). The joys of DIY…a major freak out moment with a full out tantrum but no choice but to fix the damage and move forward. Unfortunately it happens and DIY doesn’t always go as planned. Sometimes there are setbacks!
We shut off the water, capped the supply lines, removed the toilet and vanity, removed the flexible rubber/plastic(?) baseboards

{I know…so gross!}
and got to work on removing that old floor…

We prepared the floor for tiling by screwing down Hardibacker. Russ made the cuts. We used newspaper to create a template around the shape of the bathtub. and for the hold for the toilet, using a circular saw for straight cuts and a double sided knife blade (I don’t remember the brand of the one he uses) for rounded cuts.

Using Locktite and screws, we secured the Hardibacker to the old floor to create a smooth, level surface for tiling. Make sure that screws are flush (or even countersink them a little).

We made the decision of where the tile would end in the door way. I believe the center is the perfect spot. But, we extended it a small bit after shutting the door to see the ideal spot (where wood floors from hallway would not be seen in the bathroom and tile floors would not be seen from the closed bathroom door in the hallway.
Mr. DIY used a saw called a “Fat Max” to under cut the door jamb so that tile would fit neatly underneath…

We used a masonry/tile saw (also called a wet saw) to cut tiles. For this project, we cut and laid out all of the tiles in advance, using spacers during the process to get the best fit.
We laid out our tile, deciding on the best design for the space. We do love creative patterns but given our time frame, the shape of the tub, un-square walls and the fact that not much floor space actually shows when the toilet and vanity are in place, we decided on a basic grid design. We used the same newspaper templates we created for the Hardibacker for cutting tiles to fit the shape of the bathtub and the hole for the toilet plumbing.

The Home Depot Tile Specialist suggested we center the pattern in the door way and work from there but for us, when working with odd cuts near the tub and not wanting cut tile framing one whole tile in the door way, we worked from right to left, starting in front of the tub so that smaller cut tile pieces would be behind the vanity and toilet. I liked the look of one cut tile on the left corner of the room hidden by the vanity/hinged door area better. There is no wrong way…just do what feels right for your space.

We chose a ceramic tile called “Carrara” from the Daltile Atmosphere Collection at the Home Depot. Affordable, stylish and easy to install, Daltile was the perfect choice when selecting tile. I loved the colors, white with a gray veining, the flow and movement it’d bring to the super tiny space and the durability of ceramic tile for a rental bathroom.
I labeled cut tiles using FrogTape so it didn’t feel like we were putting together a jig saw puzzle when moving on to the next step.

Now we won’t be confused when putting it back together…

For this tiling project, we used Omni-Grip as our mortar to secure tiles to the Hardiebacker and 3/16 spacers.

We used a trowel to spread the Omni-Grip and placed the tiles, working our way out of the room. We did our best to get straight lines.

We let this dry for 48 hours while we worked on other things.
We chose a sanded pre-mixed urethane grout called Quartz Lock for it’s features:
- Superior stain resistance
- Color consistency
- Crack resistant flexibility
- Mold/mildew protection
Materials for grouting:

Apply grout to the float with a putty knife and smooth into the spaces between the tile. “Smoosh” it into the spaces.
Be sure to clean the tiles to remove excess grout with a clean wet sponge along the way.
We did not grout along the tub – we used caulking there. In the event something needs changed in the future, we didn’t want the mess of trying to remove grout from the cast iron tub.

I would have preferred that we created a more uniform grid. But we did our best. If I don’t look right at it, it doesn’t bother me. lol And in the big scheme of this apartment rental, an old building full of imperfections, this looks pretty darn good!

An amazing difference!
gross bathroom floor before…

bathroom floor (and a little sneak peek of the renovated apartment bathroom) now…

The Home Depot is the one-stop-shop for all tiling needs, whether you are an experienced DIYer or a first-time tiler. I’m so happy with our selection. Love the Daltile Carrara and meeting with the Home Depot tile specialist and getting some tips saved us some time and headaches! See the entire Daltile Atmospheres Collection at the Home Depot.
Almost time for the full apartment reveal! Just finishing up the hardwood floors this week then time to decorate and get her moved! I’m trying to hold off on other tutorials and info until after the big reveal…it’s so hard! I want to show you every step as I complete it!
Sharing here:
The Home Depot partnered with bloggers (like me!) to participate in its Daltile program. As a part of the program, I received compensation in the form of a Home Depot gift card to participate in promoting the new Atmospheres Tile Collection by Daltile. Opinion and experiences are my own words. The Home Depot’s policies align with WOMMA Ethics Code, FTC guidelines and social medial engagement recommendations. I am a DIY blogger and I approved this message.
This is a sponsored post brought to you by FrogTape. The opinions are completely my own based on my own experience.
![]()
Sharing here: 
WOW! What a great choice in tile…looks clean and fresh! I am so happy I read this post! I am still debating what to put in my boys bathroom and now know NOT to put in the wood floor! Great job girl!
More awesomeness from you and Mr. DIY! Wow!
Wow, what a difference! It looks great! I really like the look of the tile. So much better! Looking forward to seeing more.
HUGE DIFFERENCE! It looks awesome!
Great job! I love those tiles!!
The floor looks gorgeous!! I love what you choose too. It really amps up the elegance factor for that bathroom. Nice job :)))
Amazing job as always! I cannot wait to see this apartment after you and Mr. DIY get thru with it!
Beautiful looking floor! Great job installing it to the both of you! I enjoyed reading about it and am getting more and more excited for the big reveal of the finished apartment! Thank you for sharing!
Nice job Roeshel. The new time makes such a big difference and adds character to the space. In my experience, tile is the way to go for all rental bathrooms 🙂
Wow! What a huge difference that beautiful floor made! That was a great choice.
I love the marble look of that tile! Y’all did a great job- only you will even notice any imperfections. I can’t imagine wood floors in a bathroom- yikes!
Pingback: DIY Project Parade – a place to share and search for DIY creativity | | DIY Show Off ™ - DIY Decorating and Home Improvement BlogDIY Show Off ™ – DIY Decorating and Home Improvement Blog
Looks great! I can’t believe how difficult it is to find a carrara-like alternative. Could you possibly post a link to the extact item you used? Your link brings me to the entire collection and I want to be sure I’m looking at the same product. Thanks.
Thanks, Janice. I believe this is the product: http://www.homedepot.com/p/Daltile-12-in-x-12-in-Cararra-Tile-11-sq-ft-per-case-MA031212HD1P2/203183269?N=5zt#.UYF4hJUTszU
Thanks! Those are the ones I was looking at but the veining on yours looks so much darker than the photo on the website.
Great job, laying tiles is not something simple.