Family Room Baseboard {DIY installation and caulking tutorial}

The old baseboards in the family room were 2 inches tall and lacked the character displayed in the rest of our home. The family room was a later addition to the house. After the bamboo floor was installed, we decided to go with a taller baseboard. I chose 6 x 1 inch pine.

Before…

baseboard tutorial

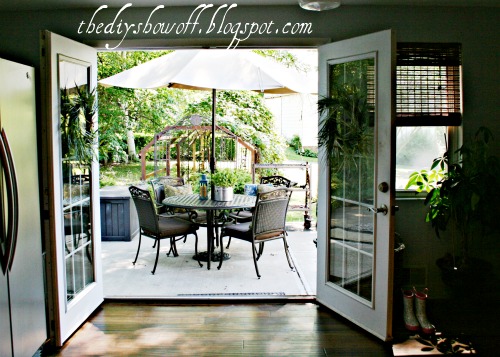
I started to the left of the French doors, measured and cut my board to fit the space. I do not miter baseboards. When you see the finished job, I promise you no one is going to notice that the joints/corners are not mitered.

baseboard tutorial

I moved along, placing my next un-cut 8 foot piece into place from the corner.

baseboard tutorial

Moving along to my third piece, I butted it up against the far wall to where it meets the second un-cut piece placed and draw a line where the two boards meet. This is where I’ll cut.

baseboard tutorial

So simple. I cut all of my pieces and ‘framed’ the room. {pardon the old hunter green furniture}

baseboard tutorial

Starting with “A”, I label each board so I know the order they are to be placed around the room. I got up to “K” I think. You can mark the wall too, but just having the boards in order and knowing where you start works.

Next I hauled the boards to the basement and gave each piece of baseboard two coats of paint {Benjamin Moore Chantilly Lace in a semi-gloss finish) on three sides.

painting baseboards

My Porter Cable nail gun/compressor makes installing baseboards super easy.

Porter Cable nail gun & compressor

I just a nail every 14 inches near the bottom of the boards and a staggering nail near the top in between the bottom nails.

baseboard tutorial

{bad hair day = hood for pics and if you misplace safety goggles, sunglasses are the next best thing}

Our walls are not plumb. There are gaps where the baseboards gap and don’t sit flush against the wall. But that’s okay.

DAP Dyna Flex and FrogTape

Enter: DAP DynaFlex. DynaFlex is DAP’s most advanced indoor/outdoor premium latex sealant with technology that is both waterproof and paintable. It combines outstanding durability, adhesion and flexibility with easy tooling, paintability, and low odor, while also keeping insects (SPIDERS!) from entering through small gaps and cracks. It is mold and mildew resistant, making DynaFlex ideal for a wide variety of projects such as sealing around windows, doors, siding, trim, molding and baseboards.

I usually leave caulking to Mr. DIY but this time I did it myself. We’ve been really busy with real life things, so this is a task I kept putting off thinking it would be more difficult and take more time than it did. I was wrong! Caulking is the easiest DIY job I’ve ever done. And it took only about an hour.

Seriously the hardest part was learning how to load the caulk gun. Cut the caulk tube on an angle creating a small hole. And insert the tube into the gun.

DAP Dyna Flex

Handle up means “on”. Handle down means off.

caulk gun

Turn the tip of the tube so the flat side of the angled cut will rest in the ‘crack’ where baseboard meets wall.

Turn handle up to “on” (work quickly with a full tube – it pushes itself out!) and push the metal tab to start placing a bead of caulk in where the baseboard meets the wall, move along. Push. Release. Push. to maintain a steady bead. I worked in 4 foot sections. (Tip: With a new tube, be QUICK with turning the gun off an on – it will continue to squeeze out when you aren’t looking!) Remember to turn handle to ‘off’ position when you set down the caulk. As the tube empties, it will require more gripping muscle.

I had a small dish of water, a small waste basket and lots of paper towels on hand.

Dip finger into water and smooth out the bead of caulk (paper towels or rags are necessary). If it gets onto something it shouldn’t, it’s okay. It wipes/washes right off.

It created a beautiful straight flat bead filling in the gap between the wall and baseboard.

how to caulk

At first I even lined the top of the baseboard and the wall where it meets the baseboard with Frog tape to create a straighter line.

caulk installation collage

But found that the extra step wasn’t really necessary. It might be helpful if you had a big contrast between baseboards and walls. But if I made a mess or an ‘oops’, DynaFlex was easy to wipe away/clean when wet.

before

baseboard tutorial

then…{better but yikes!}

DIY baseboard tutorial

now…

DAP Dyna Flex baseboard caulking tutorial

Family room still in progress but these small details are important. DAP Dyna Flex is sandable and paintable! It’s tempting to end at this step because it looks good enough, but painting will help seal everything and give it a uniform look. Next up filling the nail holes, light sanding and paint touch up. What do you think? An easy enough project to do on my own.

DIY baseboard tutorial

Cost:  approx. $100 for wood and caulk (less than two tubes) for an approx. 200 sq. foot room.

This post is sponsored by DAP but opinion, photos and tutorial are my own. 


DIY Project Parade & DIY Highlights

DIY project Parade linky party button

How was your week? I’d love to see what you’ve been up to. You’re invited to link up below to share your latest DIY. The other day I shared some fun kitchen sprucing up

farmhouse kitchen collage

And here are some highlights from a few DIY friends who joined the party last week:

Hollie from I’m Busy Procrastinating stopped procrastinating and shared her stunning master bedroom reveal. Here’s a sneak peek brought to you by her kitty, Gypsy {so sweet!}…

gray cat

Sarah from Cozy.Cottage.Cute. made a beautiful rustic growth chart. If it’s okay to have one for nieces and a nephew…I need one!

DIY growth chart

My do-it-yourself is usually just that…I do it myself.  Betsy, from Betsy Speert  was sweet enough to help her friend create this cozy cottage living room {lucky girl!}…

beach cottage living room

Andrea from Decorating Cents shares her beautiful kitchen reveal and what a transformation it is! I love the chocolate cabinets…yep, that’s what would make me smile everyday and that gorgeous glass tile is the icing!

kitchen before and after

What a welcome! Tausha’s entryway will charm and bring smiles the minute anyone walks through the door. Cheery and happy at Sassy Style

entryway makeover

Tight budgets inspire creative ideas, right? Definitely. Kim’s clever ski pole lamp is the perfect (and much more fun) than the usual $$$ tripod lamp. See more (Kim’s cute ski-ing instruction included) at Reposhture.

ski pole tripod lamp

And speaking of skimpy budgets and DIY, I LOVE how Mindy at Heart Maine Home recreated a nearly $50 rope knot book end for $9 with an awesome tutorial so you can make one too!

DIY rope knot book end

Let’s see what’s been keeping you busy! Please remember to leave me a comment…just because. 🙂

DIY Show Off
<div align="center"><a href="https://diyshowoff.com/category/other/diy-project-parade/" title="DIY Show Off"><img src="https://i899.photobucket.com/albums/ac195/Roeshel/DIYprojectparadebutton-1.png" alt="DIY Show Off" style="border:none;" /></a></div>
  1. Please use the button above or text and link to this post to share the linky love. Here is the link: https://diyshowoff.com/category/other/diy-project-parade/.
  2. Your post must be recent, shared at one DIY Project Parade only (not continuously) and be DIY related.
  3. Include your name or blog name and project title. Add your permalink (not your blog url, but your DIY project post url).
  4. Or email your link to thediyshowoff@gmail.com and I will add it for you.
  5. This blog linky party is for DIY projects only. Links not related to DIY will be deleted. Please share your link one week only.  Please do not link recipes, giveaways, linky parties, promotions or a collection of inspiration. 
  6. NOW you can “like” the links!  What a fun idea!  Most liked links may be included in a post of DIY Project Parade highlights later in the week, featured on DIY Show Off Facebook or Pinterest.
  7. Visit a few other links to make some friends and to collect some creative inspiration! If viewing in an email or reader, click here to see the links and join the party.


All things {farmhouse} kitchen

There are two small DIY projects in the kitchen this week that I want to share with you. 🙂

Russ enjoys cooking outside (Big Green Egg is his other love) and we entertain and dine on the patio often when the weather allows.

The dresser stores his BBQ and smoking tools near the door and patio. The numbers will be helpful in reminding him where things are.

farmhouse kitchen

I painted our “microwave cart” dresser a pretty shade of dark distressed red and numbered the drawers. The wood tone shows through…

aged distressed red dresser

I also made a “Farmer’s Market” sign for the bulkhead above the kitchen sink and windows.

farmhouse kitchen

Farmhouse kitchen details:

farmhouse kitchen collage

  1. Cow canvas (wuslu.com)
  2. Area rug (OneKingsLane.com) – with DIY red detail
  3. DIY distressed Farmer’s Market sign (tutorial coming soon)
  4. DIY door clock
  5. Two teacher’s desks create a temporary island/eat in area
  6. DIY lazy Susan spice rack, DIY sliding ladder and antique chicken feeder cook book library 
  7. Numbered red/glazed dresser {microwave cart and storage}

(more links to painting kitchen cabinets, marble subway tile installation and more kitchen DIY at the DIY Show Off home tour)

And since the kitchen’s clean, I couldn’t help sharing some updated pictures:

desks as a kitchen island

Still on our DIY to-do list:

  • baseboard trim
  • stove/range back splash
  • a DIY taller kitchen island with storage and seating
  • work on the pot rack
  • pantry in another area of our home
  • framing a window
  • kitchen curtains

Kitchen when we bought the house:

Kitchen now:

farmhouse kitchen

From all angles…

DIY farmhouse kitchen

farmhouse kitchen

farmhouse kitchen

mail sorter, butler's pantry

farmhouse kitchen

farmhouse kitchen

farmhouse kitchen

farmhouse kitchen

DIY farmhouse kitchen

desks as a kitchen island

farmhouse kitchen

desk island

marble subway tile backsplash

eclectic kitchen

I’m entering the contest at WhisperWood Cottage!

Funky Junk's Sat Nite Special