DIY Project Parade ~ DIY Pipe Curtain Rod Tutorial

HAPPY NEW YEAR, DIY SHOW OFF FRIENDS! 2011 was awesome and wishing you an even better 2012. Welcome to the First DIY Project Parade of 2012!

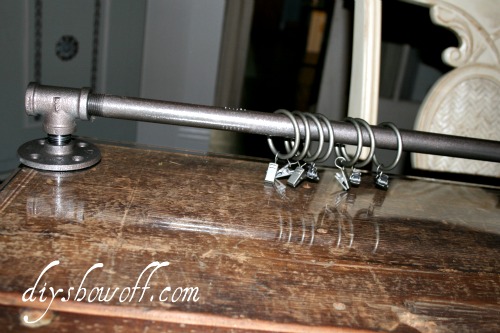
12 foot curtain rods are expensive!  I love the look of our new affordable DIY curtain rod made from pipe and fittings:

I knew True Value would stock the materials I needed:
2 – 6′ galvanized steel pipes (True Value will cut/thread the ends to any size)
3 galvanized 1/2″ flanges
3 galvanized 1/2″ tee fittings
3 1/2″ connectors {nipples}
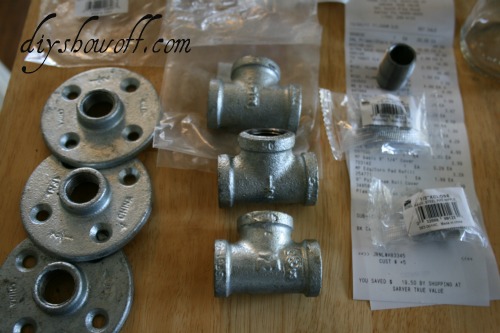
Parts:

Drywall screws

2 finials and 1 wine cork

Tools:
Stud finder
Drill
Screw driver
Level

I gave all of my pieces a coat of Krylon‘s hammered metal:

1.  Find and mark studs. Measure/mark the height you’d like the curtain rod to hang (not my hairy arm!).

2. Attach “tee” to flange using nipple. Do this for all three pieces.

3. and 4.  Slide on curtain rings onto pipe at this stage. Tip:  Keep curtain rings clipped to plastic casing they came with or clipped to index card or piece of cardboard to help keep them in place during installation (not shown). Attach two flange sets to the ends of a pipe.

5.  Hold pipe with flanges on each end up to the wall, mark holes for screws (use a level to make sure rod hangs straight) by starting a hole with a spade bit or nail (hammer lightly).

6.  Four screws to each flange.

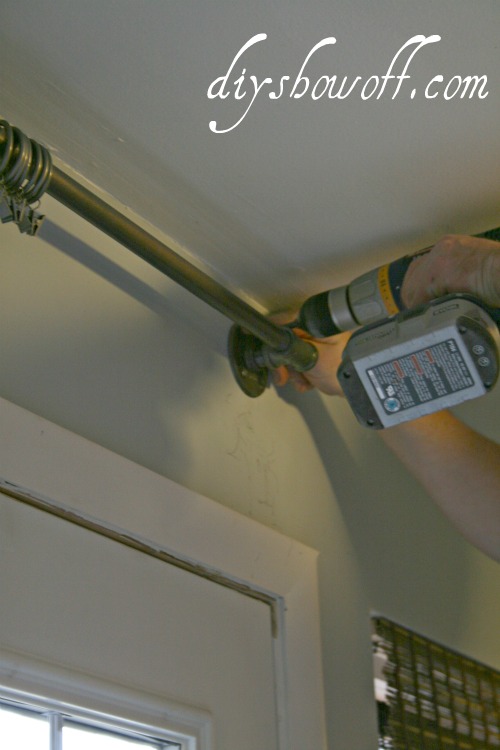
7.  Attach last flange set to remaining pipe.

8.  Slide on more curtain rings (I use 7 for each curtain panel).

9. Screw one end of pipe into the tee that’s secured to the wall.

10.  Twist flange so it’s flush to the wall.

Note:  The installation process will scuff your walls…you’ll need to touch up.

11. Repeat steps 5 and 6 for the other end.

12. Choose 2 finials that fit in your space and match your style. I spray painted mine to match the pipes.

13. Cut a piece of a wine cork in half.

14. Shave down the sides. (Make 2 pieces, one for each end of the pipe.)

15.  Push a piece of the cork into the end of the pipe.

16.  Screw the finial into place into the cork.

Done and ready for curtains!

I love the industrial look. {No Sew Drop Cloth Script Curtain Tutorial here}

More photos of the sitting room “Christmas un-decorated” coming up!  🙂

Let’s see what you’ve been up to!

The DIY Show Off

1. You must use the button above (ADD BUTTON HTML CODE FROM SIDE BAR TO YOUR POST) and link to this post to share the linky love. You post must be recent, shared at one DIY Project Parade only (not continuously) and be DIY related.
2.Include your name or blog name and project title. Add your permalink (not your blog url, but your DIY project post url). Feel free to link a Past Post, just invite your readers in a current post with a quick note.
3.Or email your link to thediyshowoff@gmail.com and I will add it for you.
4.If you notice your link has disappeared -please add the link back to The DIY Show Off to your post today, a button or a quick note to your readers about the party and try again! I love when everyone participates and readers check out everyone’s links, but I think the return favor of linking back is the nice thing to do so everyone plays fair and enjoys all of the projects and links. Also – this blog party is for DIY projects only. Links not related to DIY will be deleted. Please share your link one week only.

5.  If reading this in an email, pop over to https://diyshowoff.com to see the inspiring DIY projects linked up!
6.  NOW you can “like” the links!  What a fun idea!  Most liked links may be included in a post of DIY Project Parade highlights later in the week.

7.  Visit a few other links to make some new friends, get some creative ideas and feel free to leave me a comment. I’m likely sitting here on the computer and could use a happy distraction!
Don’t forget to come back Sunday evening and link up your 2011 DIY recap and my DIY year in review.
*~*~*~*~*~*~*~*~*~*~*~*~*~*~*~*~*~*~*~
I was one of the bloggers selected by True Value to work on the DIY Squad. I have been compensated for my time commitment to the program as well as my writing about my experience. I have also been compensated for the materials needed for my DIY project. However, my opinions are entirely my own and I have not been paid to publish positive comments. FOLLOW TRUE VALUE ON FACEBOOK AND TWITTER!~*~*~*~*~

Pin It

Quick and Easy Burlap Art

With the holidays, quick and easy DIY ideas are my best friend, especially when they’re great gift ideas too.

Materials:

HOW TO:
Using a stencil or free hand, make monogrammed art work (or silhouette or anything) using a permanent marker on the pre-made burlap wrapped canvas.
It doesn’t get any easier than that! I love how it looks old/faded…

Pin It

New Year, New DIY Show Off!

Hi DIY friends! TGIF!

In an effort to clean things up {and hopefully fix some issues}, the new year is bringing a new site.  You may have noticed that thediyshowoff.blogspot.com is now redirected and located at diyshowoff.com. Dear followers and subscribers…you’ll have noticed that you show up here on the side bar and hopefully the feed issues get back to working again – part of the reason for the blog transformation. Your patience and understanding is so appreciated.  There’s a button on the side bar to add me to your G+ circle of friends since there’s been talk of Google Friends going away for non-blogspot blogs. Tragic! But, thankfully there’s still the subscribe option, Facebook, Twitter and G+. You’ll notice things look pretty much the same for now, just a lot cleaner and more organized. I didn’t want you to think you were lost!  A few new goodies are planned for 2012.

Thanks so much for an awesome 2011!  It’s been an amazing year with lots of productivity and creativity and I just can’t wait to see what you have planned for 2012!  I’m so grateful for your encouragement and your support. I love that you stop by, visit, participate in parties and share your genius DIY and decorating talents with me. You’re each such an important part our lives. I am looking forward to starting a fresh new year, getting to know you better, continuing to share our passions for DIY and decorating, making new friends and starting on my next DIY project!

Big plans for New Year’s Eve? Do you go out or stay in? This year we have tickets at a private club to hear a popular local band (we usually stay in and have fun).  It’ll be different to get dressed up and celebrate, if we can stay awake.
I know at this time of year, I always think “new year, new me” and write down my goals and plans for the new year. Not really a resolution, more like what I want to accomplish. What is your big goal for 2012?

Hope to see you Sunday for the DIY Project Parade

and Monday…

HAVE A WONDERFUL WEEKEND!