Shaw Floors HGTV Home Design Challenge – It's Time to Vote and Enter to Win!

As you know (warning:  I’ll be mentioning this here and there all month long – I’m that excited to share this with you!), Cassity from Remodelaholic and I teamed up to create a coastal  cottage room designed around the beautiful Shaw Floors’ handscraped maple (Style: Rockbridge/Color:  Dusk) and Ikat Panel (multi) area rug. It was a dream come true experience to design a room around this flooring. 

I still smile every time I see this room. 
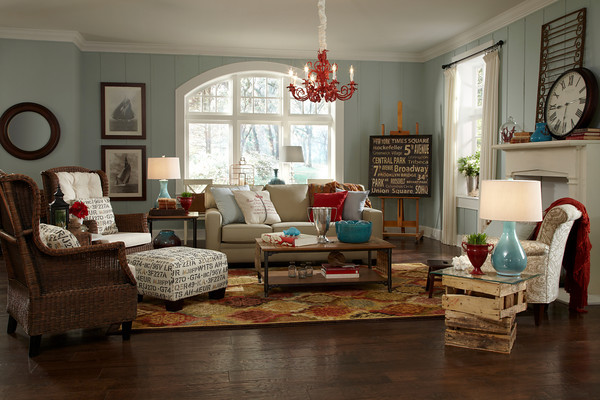
I’d love for our family room to look like this and I had so much fun designing it. 
Every detail, flooring, rug, paint color and accessories are comfortable and I feel right at home.
When decorating a room, do what you love…

The Shaw Floors HGTV Home Design Challenge Contest and Sweepstakes is up and running NOW through September 30th!  You can vote for your favorite room everyday! 
VOTE HERE:
Simply “like” Shaw on Facebook and vote for your favorite room (any of the 5 rooms designed by 5 teams – some amazingly talented and super friendly DIY and design bloggers) and while we’d love your vote for Cassity & Roeshel, all of the rooms are gorgeous. 

To enter the sweepstakes:

·         Like Shaw Floors on Facebook (www.facebook.com/shawfloors)
·         Enter your email address in the 30 Days of HGTV HOME tab
·         Vote for your favorite room – every day in September. EVERY DAY you’ll be entered! 30 prizes total!

By entering the sweepstakes, you can also print off a voucher to receive a free HGTV HOME tote bag and a free HGTV HOME area rug with purchase. Isn’t that sweet?!  Winners will not be announced on a daily basis due to the verification process to ensure winner is a real person, etc. Winners will not be announced on the Facebook Page during September but soon afterwards!

As camera shy as I am (deer in the headlights syndrome!), I wanted to share our experience with the Shaw Floors HGTV Home Design Challenge.  Please don’t laugh at me too hard!  Cassity is a natural.  Me, not so much.&nbs
p;

Here are the videos that show our interview with Lisa LaPorta (HGTV’s Designed to Sell), describing our room: 


Cassity and I getting to know each other (she’s “awesome”!):


and a video that gives information on the event. Lisa Laporta is that cute in real life!


We would love for one of our readers to win new flooring or an area rug of their choice! And we’d love your vote!  Winning room/blog team gets all-expense paid trip to the HGTV Urban Oasis Home!  Hurray!  I’d love to win and share the experience with you, dear friends! Your support means so much to me.  You all are the best!  Please pop over to enter to win and vote at 
Look for another giveaway coming up Thursday right here at the DIY Show Off!  You don’t want to miss it ~ a chance to win any Shaw HGTV Home rug ANY SIZE!

Powder Room Decorative Details

We remodeled our powder room a few years ago but there were some unfinished details that finally got some attention. 
Our powder room was originally the end of an entry area to our home with a window and a small coat closet.  Somewhere down the line, a previous owner put up a wall and door, installed some plumbing and created a small powder room.

Before
As you can see, this half of the small powder room used to be the closet originally.  We installed a shelf above the toilet and for years, I’ve been looking at those exposed screws and I finally reached a point where I can’t take it any more.

I saw this cool Flexible Dentil Molding at Rocker:
Flexible Dentil Molding
Inspiration for an easy DIY project! 
I measured and cut it with scissors to fit.
Next:  Glue in place. I used Gorilla Super Glue.  I did have to hold it in place and apply pressure for a couple of minutes. I’m sure there’s a better method, but this is what I had on hand and it was easy to use.  Use a level to be sure it’s ‘level’. 
Then all I had to do was paint it.  I used a craft brush to easily get into all of the grooves. I used the same color as our walls.  Painting it white like the rest of the trim would have been pretty too (paint it before gluing it in that case.)
Doesn’t it look better? Love this product! (It’d be awesome for curved/rounded areas!) No more ugly screw heads showing and a little extra pretty detail. 
I‘ve had these plaques for years as well but because hanging them is an ordeal, they’ve sat on a shelf. 
ugh…
Dischangers make hanging so much easier.

Wet the back of the disk using a fingertip and
water.

Wait about a minute and apply to the center of the back. Smooth into place.

Let dry over night (important step!) and hang! 

What do you think?  Sometimes the smallest details make a big difference. I love how it turned out. 
Want to see how nasty this bathroom was when we bought the house?  Visit Powder Room Makeover to see the before and progress. It was one of my first blog posts here at the DIY Show Off.  🙂

*I received linked products mentioned as part of my participation in the 


Link up your DIY project in the Monthly DIY Contest for a chance to win a great prize package!

DIY at Dream Book Design

It’s not a secret to Adrianne that I love her blog but in case you didn’t know, I’d like to introduce you to 

Dream Book Design

Take a look at her latest projects.  Dreamy!
So pretty!  Makes me want to give up our sleigh bed and start from scratch!
Love these DIY knotted pillows.  Great no sew project!
And my favorite:
How To Make a DIY Tripod Lamp ~ isn’t this gorgeous? 
Thanks so much for sharing your DIY creativity, Adrianne (and Jeremy)!  Beautiful work!